
September 25, 2024
Kelvin Unit Cell Available for Use with Hexahedron Meshes
Lattices can now be generated using the Kelvin unit cell within a hexahedron (hex) mesh.
Hex mesh-based lattices are often chosen for aesthetic reasons rather than performance because of their regular surface patterns and relative softness compared to lattices based on tetrahedron (tet) meshes. In the context of other hex lattice types, Kelvin falls in the middle of the pack for both stiffness and volume fraction (the percentage of the total volume).
Example: The Kelvin unit cell populating a hex mesh

First generate a Hexahedron Mesh and select it as the input for your Strut Lattice for the Kelvin (Hex) option to appear. To apply this unit cell, find the option for Kelvin (Hex) under the Lattice type drop-down within the Strut Lattice operation.
Lattice Search does not include data for the Kelvin unit cell within a hex mesh at this time. Do not substitute Kelvin data associated with tet meshes, because the two are not equivalent.
In Design Engine, the Kelvin unit cell is not available as an option in the Strut Lattice operation for tet meshes, because this combination typically results in a lattice that is too dense for manufacturing and/or desirable end-part performance. However, performance data for Kelvin unit cells within a tet mesh is searchable in Lattice Search, and you can use the Apply Unit Cell command from within Lattice Search to generate a Kelvin unit cell upon a tet mesh if desired.
Request Unit Cell Performance Data Removed from User Interface
Because the Lattice Search tool does not contain data for every conceivable combination of unit cells and parameters, Carbon has long provided a “Request unit cell performance data” button to invite users to quickly alert us to combinations that may be helpful. Thanks to users’ input, we now have a solid body of request data to help guide future iterations of the Lattice Search tool, and are removing the button to streamline the user interface.
Users remain welcome to use the “Request Help” button for assistance with Design Engine when needed.
September 9, 2024
Improved UI performance
Application performance has been improved for large models and complex projects, enabling Design Engine to feel more responsive.
August 21, 2024
Models Menu
The Meshes menu on the right-hand panel has been renamed to Models to better reflect the variety of formats that may be included in this directory.
- Meshes → Models
- Input Meshes → Input Models
- Generated Meshes → Generated Models
Additionally, scrolling behavior for the Models lists (formerly Meshes) has been improved to retain the header when scrolling through a long list to enhance usability for complicated projects.
July 10, 2024
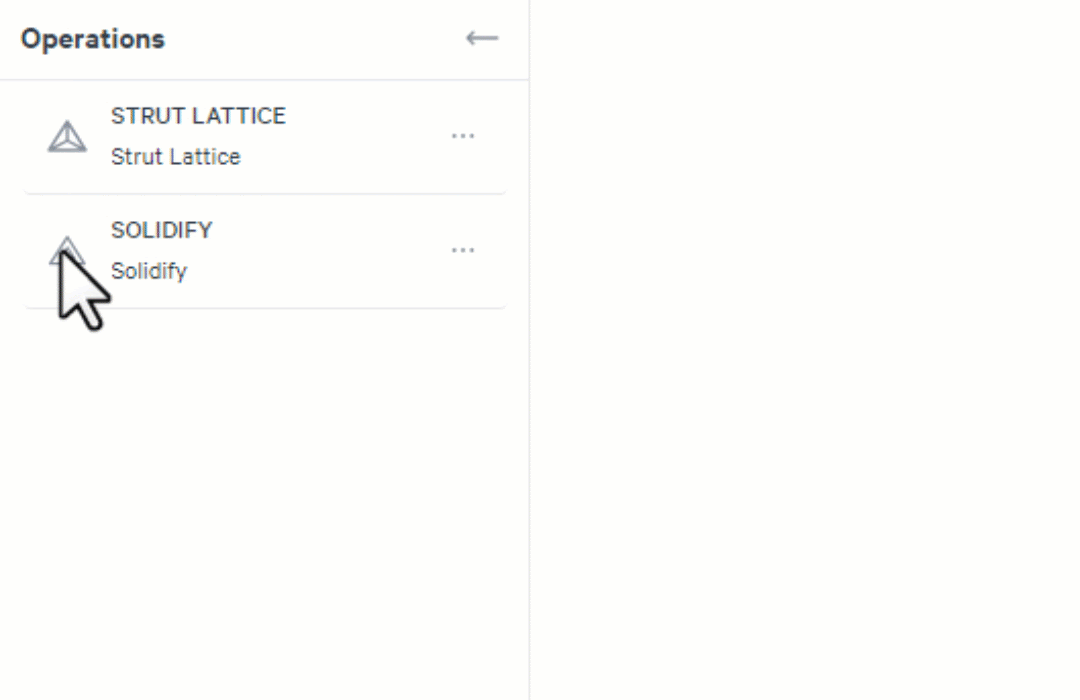
Grouping Operations
Operations can now be grouped, allowing for easier management of large, complex design projects.
To create an Operation Group, select multiple operations (use CTRL+click [Windows] or CMD+click [Mac] to select individual operations, or SHIFT+click to select a series of operations), then right-click and select “Create new group.”

Once an Operation Group is created, you can expand or collapse visibility of the grouped operations, re-order the operations within the group, re-order the group’s position in the operations list, move individual operations into and out of the group, duplicate the group, rename the group, ungroup the operations, and delete the group (including all operations within). Groups nested within groups are not allowed.
To move an operation into or out of a group, either click and drag to the desired location or use the Operation menu (right-click or (…) icon) and select “Add to Existing Group”/”Remove from group.” To add or remove multiple operations to an existing group, select them and use the context menu.
Duplicating a group does not maintain internal dependencies within the group. For example, a duplicated Solidify operation that is grouped with a Strut Lattice operation will reference the original group’s Strut Lattice.

Operation Groups are automatically applied to the resulting Generated Meshes, using the same schema and group name. These Mesh Groups can be expanded and collapsed independently of the operation group. The child’s visibility state can differ from its siblings and the parent’s visibility state. Toggling on the parent’s visible state will show all children that are also toggled to be visibly on, while toggling off the parent’s visibility state will hide all children regardless of their individual state.

June 12, 2024
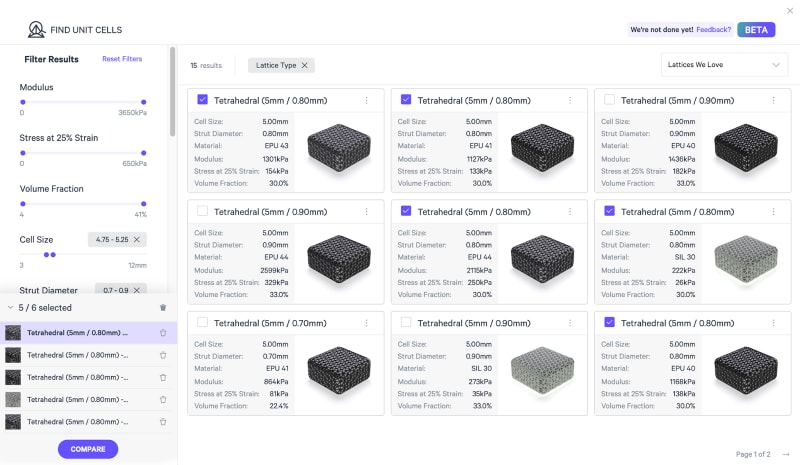
Lattice Search Includes Lattices Built on Hexahedron Meshes
In Carbon Design Engine, lattices can be generated on geometric scaffolding that is either a Tetrahedron Mesh (“Tet Mesh”), in which each unit cell is a single tetrahedron composed of polyhedrons with four triangular faces, or a Hexahedron Mesh (“Hex Mesh”), in which each unit cell is a single hexahedron composed of polyhedrons with six faces.
Lattices built on Hex Meshes are now searchable using the Lattice Search tool to more easily consider which lattice types might suit the needs of your project. Use the new “Scaffold Type” selector to indicate whether you want to survey Tet or Hex lattice results. When Hex is selected, you can opt to include or exclude any of Design Engine’s standard Hex Lattice patterns.
Example: Select “HEX” for Scaffold Type to explore Hex Mesh options

Example: Available Hex Mesh lattice patterns

Reminders about working with Hex Meshes
Creating a lattice based on a Hex Mesh: To create a lattice using a Hex Mesh, you must generate the Hex Mesh with the “Hexahedron Mesh” operation before you can select and apply unit cell parameters with the Strut Lattice operation (select your Hexahedron Mesh as the input mesh). The cell size of the Hex Mesh will dictate the size of your strut lattice unit cell.
Refining and interpreting Lattice Search performance results for Hex Meshes: When using the Lattice Search tool to consider lattice options based on Hex Meshes, restrict your search to cell sizes similar to the cell size of your existing or planned Hex Mesh to ensure a reasonable point of reference for performance. For performance statistics, Lattice Search assumes a gridded Hex Mesh with equal XYZ hexahedron dimensions. Your actual lattice performance may vary depending on your final design selections.
Applying lattice parameters directly from Lattice Search results: When you open the Lattice Search tool directly from the Strut Lattice operation (select “Lattice Search” from the Lattice Type drop-down menu) and click “Apply Unit Cell” to adopt the characteristics of a lattice option, the cell size will not be applied; the cell size of your Hex Mesh will be used. Only the lattice type and strut diameter will be maintained.
Review Hex Mesh information: Review information about Hex Meshes and how they are represented in Lattice Search on Carbon Academy.
June 5, 2024
Improved Layout for the Operations List
The layout of the Operations List has been modified to provide additional space for longer, more complex design programs. No programs have been altered; this change only impacts the way the Operations List is displayed.
Example: The original Operations List on the left, and the new condensed Operations List on the right

In the new layout, renaming an Operation will now display only the custom-edited name. The type of operation is indicated by the Operation Icon, or by clicking to view or edit the Operation.
Example: The original Operations List (left) shows the user’s custom-edited name below the Operation Type. The new Operations List (right) shows only the user’s custom-edited name, and the Operation Type is indicated by the Operation Icon and is visible when editing and viewing the Operation.

Collapsible Meshes Lists
Lists of Input and Generated Meshes in the right-hand panel can now be collapsed to provide a better experience for working with complex projects.
Example: The Input Meshes menu has been collapsed to provide a better view of Generated Meshes.

Additional Controls when Adding Struts (BETA)
When editing a lattice by adding struts (BETA), the UI will now follow the mouse to snap to endpoints or to the midpoint of the selected strut (rather than just the endpoints). To place a strut end at a different point (neither the end nor the midpoint), hold the Shift key to disable snapping behavior.
Example: Easily select the middle or end of a strut when adding a new strut
MAY 22, 2024
Expanded Tile Texture Functionality
Custom Texture Tiles
Users can now upload an image as a custom texture tile. In the “Pattern” section of the Texture operation, find the new “Custom Tiles” section and use the provided tools to upload an image.
Example: An image can be uploaded for use as a custom texture tile.

Best practices for images:
- Only PNG files are supported.
- Small file sizes are best; an image of a few hundred KB (and certainly less than 1 MB) will suffice.
- Images with crisp black/white divisions might result in textures with jagged, pixelated edges; for best results, use photo-editing software to apply a blur to your image before uploading it as a texture tile.

- The white part of your custom image is the “active” part of the texture for embossing/debossing. Specifically, when texture depth is set to a negative number (debossed), the white portion of your image will be debossed, and when texture depth is set to a positive number (embossed), the white portion will be embossed. Use “Inverse Image” to swap this behavior.
- Black/white or grayscale images are the easiest to work with, but color images are allowed. If a color image is used, it will automatically be converted to grayscale based on an average of the RGB pixel values.
- Images do not need to be square; when non-square images are used, the top/bottom edge of the image (at the time of upload, before any rotations are applied) will map to the specified tile size.
Texture Rotation and Translation
Tiled textures (including custom textures) can now be further adjusted using new “Tile Rotation” and “Tile Translation” tools.
Tile Rotation can be used to straighten or angle the image. Adjustments are measured in degrees.
Tile Translation moves the overall placement of the texture on your model. Adjustments are measured in the same units as your model (mm or inches).
Example: New Rotation and Translation tools are available for Tiled Textures.

Achieving the desired result might take some trial and error. To more closely track the impact of various rotation and translation changes, we recommend altering one factor at a time and inspecting the results before applying other adjustments.
MAY 1, 2024
Strut Info Tooltip
Hover over a strut in a lattice to view key information about the strut (diameter, length, and whether it has a special designation such as a boundary strut or a feature edge).
Detailed strut information can be useful when editing struts or reviewing the results of a zonal lattice structure that includes different strut parameters in different parts of the design.
Note that the tooltip is available for strut lattices only and not solidified lattices.
Example: View a Strut Lattice, then hover over a strut to see detailed information about its specifications

APRIL 10, 2024
Lattice Search Includes Foams in the Meta-Materials Library
Design Engine users can now easily find comparable lattice/material combinations that match or outperform common foams, without needing to cross-reference outside resources.
The following foams are available:
- Foam similar to D30 Aero
- Foam similar to D30 Decell
- EVA
- High Density
- Latex
- Memory
- Neoprene
- Packing
- Foam similar to Poron XRD
- Rebond
- VN1000
- VN600
- VN740
Additional helpful information about working with foam comparisons (such as retailer specs for listed foams and information about converting a shore hardness rating to modulus) is available on Carbon Academy.
Example: Common foams are available in the Meta-Materials Library (click “Lattice Search”)
Example: Comparing lattice options for potential foam replacement

Data is based on simulations for lattices and physical testing performed by Carbon for foams. Final part performance may vary. Check out the blog post providing detailed information on Carbon’s performance testing
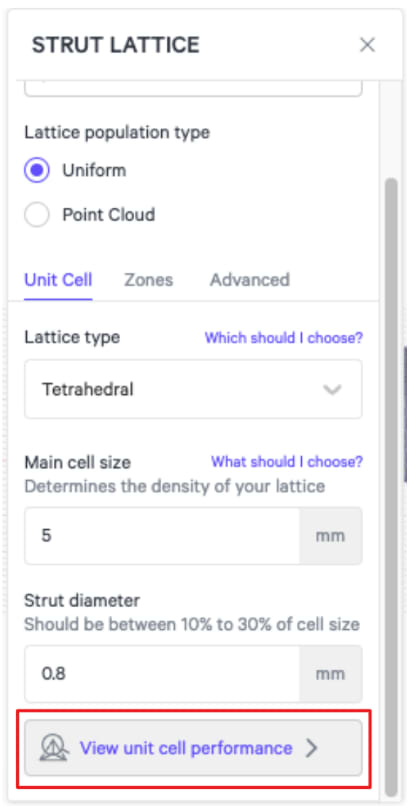
Outdated lattice performance data deprecated
The “View Cell Analysis” button (sometimes shown in the Strut Lattice operation depending on selected input parameters) is no longer available. This tool referenced an older dataset that has since been superseded by the Lattice Search tool.
Example: Marked elements in this image are no longer available

Rely on Lattice Search to understand performance characteristics of various lattice/material combinations. Click “Request performance data” for any combinations you encounter that are not readily available.
Example: “View unit cell performance” will display up-to-date information from the Lattice Search tool
MARCH 27, 2024
Tiled textures
In addition to random “noise” textures (released in Carbon Design Engine™ software in 2023), users can now add decorative tiled textures to meshes. Tiled options appear as new entries in the “Pattern” drop-down menu within the existing Texture operation:
- Cube
- Diamond
- Dot
- Grid
- Hex
- Pyramid
Tiled pattern options:
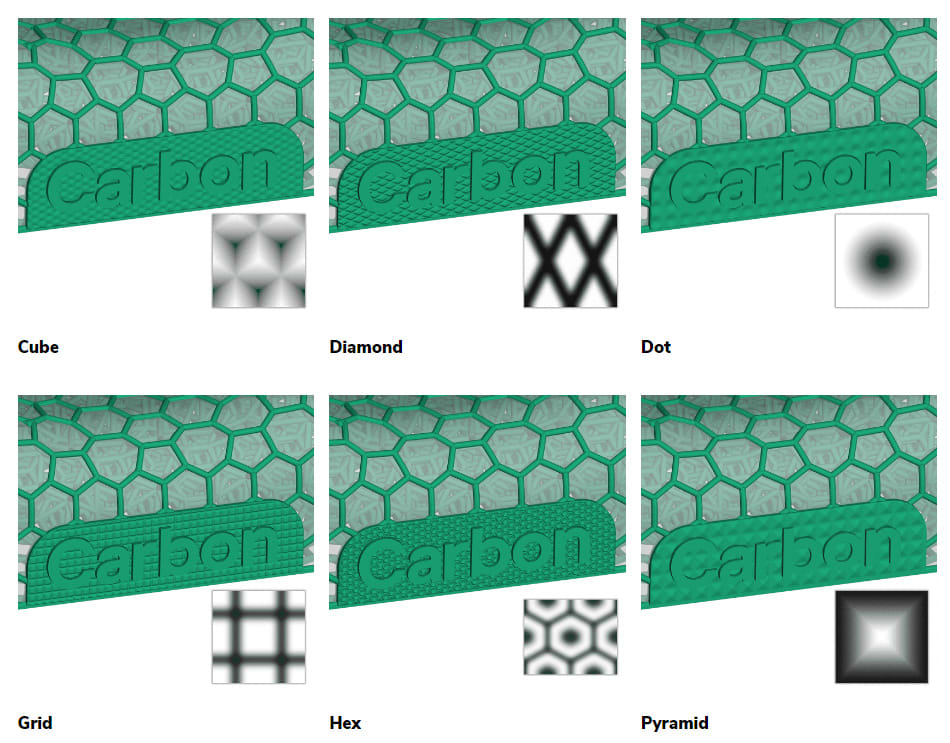
Embedded controls allow users to control the tile size (the size of each individual texture feature) and depth (embossed or debossed) of the pattern. The selected texture can also be inverted to create a negative version of the pattern.
Note that patches must be contiguous for a successful texture application; process unconnected patches as separate Texture operations.
For users familiar with accessing tiled textures with the Print Preparation interface, applying textures in Design Engine should be faster and more robust. Additionally, editing a texture once applied (e.g., changing the pattern, tile size, depth, or boundary decay settings) will return a fast revision result for easy design iterations.
Remesh
Remesh creates a new triangle mesh representation of your geometry with more regular triangles. Remeshing may be useful if a poor-quality mesh is limiting the outcomes of surface operations (e.g., texturing).
Remeshing typically creates more triangles to better represent the desired geometry, and therefore increases file size.
Access Remesh from the new “More mesh tools” drop-down next to the Decimate operation
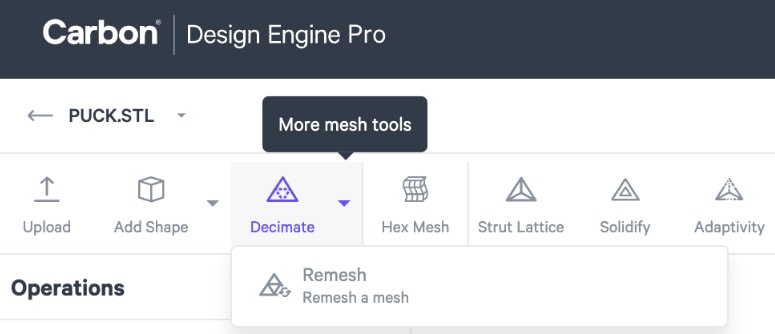
Example: Remeshing a surface for optimal tile texturing
February 7, 2024
Replace Mesh
Any Input Mesh can now be replaced with an alternate mesh using the “Replace Mesh” feature. “Replace Mesh” will swap out the mesh in all operations in which that mesh is selected. This can be useful if you need to swap in an updated version of a file without redoing Operations work, or if you wish to duplicate a previous project to reuse a list of Operations on a different model file.
Note that any patches present on the original mesh will need to be reselected after replacing a mesh.
Replace Mesh is accessed from the menu options available for each Input Mesh.
Additional Part Info
Additional part information is now available for input meshes, including volume, units, and triangle and vertices counts. Click “View Info” from the Meshes menu to access information. Note that some fields may be unavailable for some meshes and/or for some users.

January 31, 2024
Decimate
Large, complex meshes (typically >50 MB and/or >1,000,000 triangles) can be challenging to work with due to long processing times. Decimating a mesh reduces the number of vertices and triangles to simplify mesh geometry.
Consider decimating a mesh whenever your file is >50 MB, has >1,000,000 triangles, or when you know that your model contains more triangles than is necessary to accurately represent the desired geometry. Experiencing lagginess or slow processing might also be an indication that decimation could be helpful.
Decimate is a new option in the top menu, near “Upload” and “Add Shape.” Decimate is intended for input meshes only; Carbon does not recommend decimating generated meshes.
Note that decimation can cause your model to lose detail as triangles are removed/combined. This impact will vary based on geometry; there is no single “right” level of decimation or target number of triangles for all geometries. Decimation is reversible and alterable; consider trying different decimation percentages to get the desired outcome.
Following is an example of how decimation can impact model geometry. The optimal level of decimation for a model will depend on your use case.
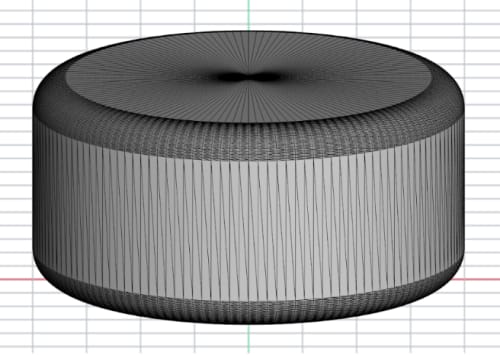


Decimate has been released as Beta functionality at this time; please submit any feedback to support@carbon3d.com.
“Zoom to fit” navigation control (center on this point)
A new “Zoom to fit” navigation control allows you to quickly center a part in the project area and zoom to the extents of the mesh. To access this command, press the F-key, select “Zoom to Fit” from the top-bar View menu, or select “Zoom” from the Meshes menu for a specific input or generated mesh.
Import STEP Files
STEP files can now be uploaded to Design Projects. The entire assembly will be converted to a single triangle mesh.
Note that meshes cannot be downloaded in STEP format (STL, PLY, and OBJ are the available download format options).
January 24, 2024
Reordering operations preserves inputs and dependencies
Moving operations within the operations list now retains inputs and other dependencies.
Note that an operation might need to be updated after it or a related operation is moved; watch for a red marking on an operation to indicate that it requires edits before proceeding.
New interface for “Settings” menu
Historically, clicking the Design Project name has opened a menu with various options (eg, Duplicate, Rename).
These options have now been moved to a “Settings” control panel. Here, you can Duplicate a design, Lock a design (see the following section for more information on this new feature), change the project name or material, or Delete a design. Access “Settings” by clicking the Design Project name.
Lock Design
A Design Project can now be locked to protect against unwanted or unintended edits.
Click the design name to launch the “Settings” control panel, then click the “Lock” icon. This action can only be performed by the project owner.
A locked Design Project can still be duplicated by any user with access, and a project owner can unlock a project at any time.
January 10, 2024
Access Lattice Search from Toolbar
Carbon offers a robust Lattice Search tool to help you identify an effective metamaterial (a combination of a material and a lattice design type) for your application based on desired performance and design requirements. Lattice Search can help you get started on a new project by quickly narrowing the vast field of potential lattices to the ones most likely to accomplish your goals.
Lattice Search has long been accessible from within the latticing operation; you can now access Lattice Search directly from the top-bar menu.
Learn more about using the Lattice Search tool (including as an example of finding a lattice to substitute for a specific foam material) in the Design Engine Tools and Features course.
Prior to January 10, 2024
Release notes were not published for changes to Carbon Design Engine™ software prior to January, 2024.